

I’m certain that most of my readers are familiar with the concept of Environment Variables. What about using HTTP Request actions in Cloud Flows? Hands up how many of you have sometimes hardcoded values “because it was fast and easy”, or you “didn’t know any other ways to do it”. Then you ended up refactoring it later anyway, because hardcoding is never considered to be an acceptable workaround? If at least one hand was raised, it gives even more the reason to write this article 🙂
Prerequisites for the setup
I’m starting with the scenario where I have an existing API Management service running, and I have created the API Subscription which contains they key to be stored in Azure Key Vault. In my example I am using a simple HTTP API with a mock response to showcase the whole concept.
Before we get into the actual configuration of the Key Vault, make sure that the Azure Subscription you are going to be creating they Key Vault into, has Power Platform registered as resource provider.
You can see this by browsing into the Azure Subscriptions, selecting the appropriate subscription, and then from the navigation select Resource Providers to see the complete list. If it is not registered, and you don’t have enough permissions in your user to register it yourself, ask your friendly Azure Admin for this registration.

Note that it is strongly recommended to create a new Key Vault per application and per environment for stronger security. This might seem like a minor issue, but just consider the situation there would be a security breach for one Key Vault, and it contains secrets for all of your environments, including your production environment. And maybe not just Power Platform environment, in worst case it could also contain multiple API keys, and the list goes on and on… So please consider spending a moment to think through this 😉
Configuring Azure Key Vault
Now let’s start the actual configuration by browsing into the Key Vaults -section of your Azure services.

Click the Create -button to start configurating the Key Vault.

Configure the Key Vault depending on your organisations preferences and guidelines (e.g. which region you create your Key Vault into, naming convention etc.)
For the permission model, make sure you have RBAC selected, as it is the recommended configuration for permission model. This guide is going to be based on the assumption that RBAC is in use.

Once you are done with the configuration parameters, go to the Review + Create window, check the overview and click the Create -button. Your Key Vault should now be ready.
In order to actually enable the usage of the new Key Vault, role assignments needs to be added. Browse into the Access control and add new role assignment.

You need to add two roles: Key Vault Administrator and Key Vault Secrets User.
Key Vault Administrator you are going to be assigning to yourself, or to whomever will be in charge of the whole Key Vault, including the secrets. It is of course possible that you delegate lesser role for managing the secrets, if you in general have more granular management over access in Azure. So consider this when assigning the Key Vault Administrator role assignment.
Key Vault Secrets User role assignment will be added for the Dataverse service principal. This is required in order to later create and configure the Environment Variable correctly! Otherwise you will get permission errors when trying to create the Environment Variable, and you will be confused as of why 🙂
When adding the role assignment, make sure you have the “User, group or service principal” -selected, click on Select Members as you would do when adding e.g. users. Then from the member list, search for Dataverse and finally add the role.

If you did everything correcly, your Role assignments should look like this. Naturally if you added more users or admins, they will show up in the list as well.

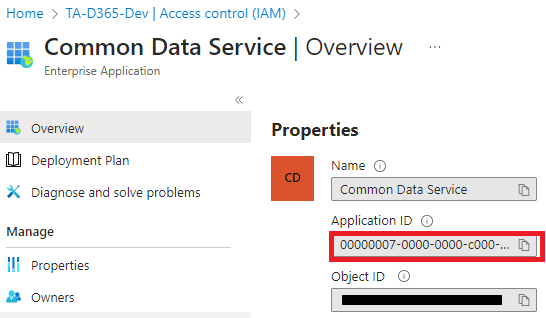
Before continuing, double check that you added the correct Datavers service principal as the user. You can check this by clicking the Dataverse on the Role Assignment list, which should open you the Enterprise Application view. Make sure the Application ID is 00000007-0000-0000-c000-000000000000. Note that this Application ID is NOT in relationship with your Power Platform Environments Environment ID in any way. So don’t panic if you don’t see your Environment ID in this view.
Creating the secret
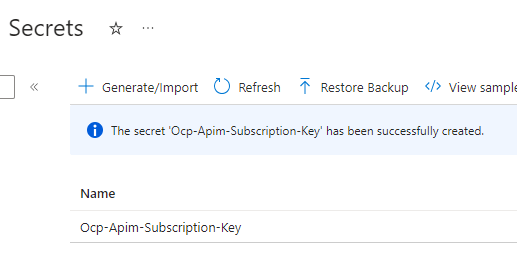
Basic configuration of the Azure Key Vault is now completed. We can now proceed into storing our first secret into this new Azure Key Vault. Browse into API Management, and find the subscription under desired API which contains the key you want to store as a secret.
I used the default subscription header name as the name of this secret to easily identify it later. If you created the secret successfully, you will get the prompt for it, and see your new secret by name in the list.
Creating the Environment Variable
Now that we have configured Azure Key Vault, and stored the subscription key into the secret, it’s time to configure the Environment Variable!
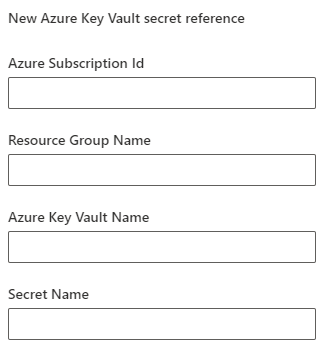
Before you close they Key Vault, write down the following information from the Key Vault’s Overview: Resource Group name, Subscription ID, Azure Key Vault name and also the name of the secret you created earlier. You will need this information for creating the environment variable.
Start either by selecting existing solution, or create a new solution to add your new variable into. I created new solution just for environment variables, which I also consider to be a good practice and part of a good solution strategy.
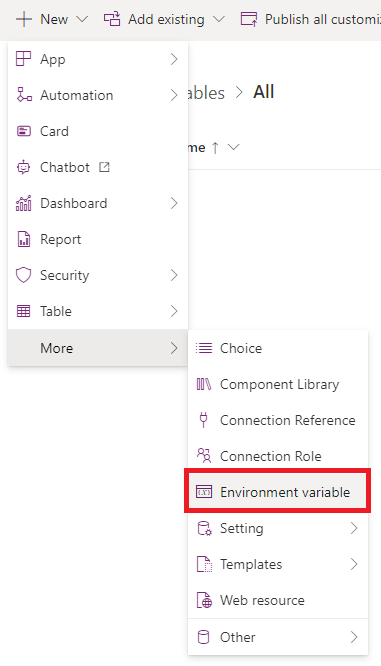
From your solution, click New -> More -> Environment variable
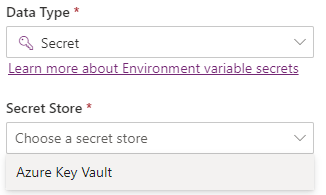
From the configuration pane, give a describing name for your new variable, and select Secret as your Data Type.
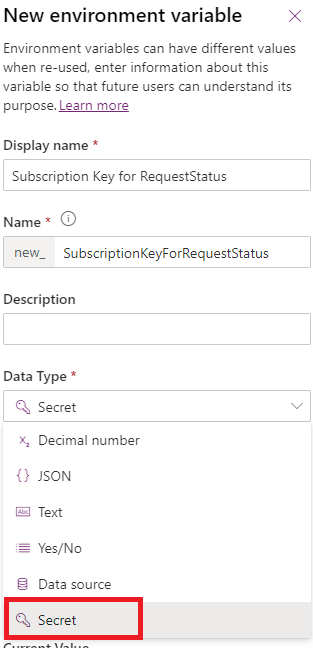
This selection will open more configuration options. You need to define Secret Store of the variable. Currently only Azure Key Vault is supported.
After this selection, you are able to create a new Azure Key Vault secret reference. This is very similar to connection reference in practice, as they both are references, or to simplify, pointers to a specific object. So no, we are not storing the actual secret into Environment Variable, we are just giving it directions about where to find the secret when somebody queries it 😉
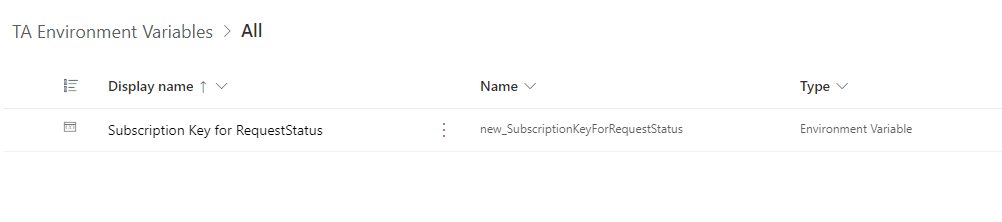
If all went correctly, you will see the environment variable in the object list. NOTE: The variable might still appear in the list even though the Azure Key Vault secret reference was not successful, so remember to double check the reference by clicking the variable once more.
If everything was ok, we can now try this out in Cloud Flow 🙂
Retrieving and passing Environment Variable Secret Value in Cloud Flow
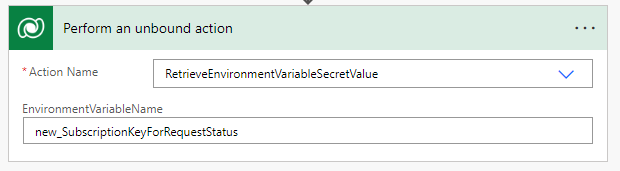
In order to retrieve the secret value from the environment variable, you need to do this with an unbound action. Find the action called RetrieveEnvironmentVariableSecretValue, and then enter the name of the Environment Variable you just created.
When you save the cloud flow, you will probably see the following warning from the Flow Checker

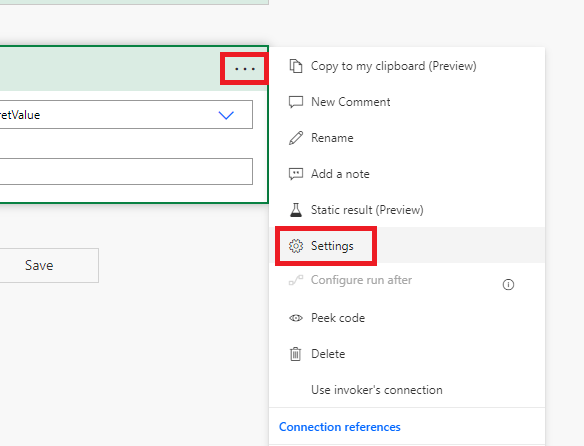
This means that you need to open the Settings for that action, and make sure that you toggle the Secure Outputs to On -state.
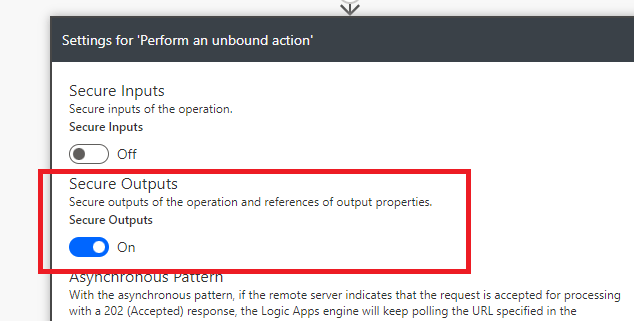
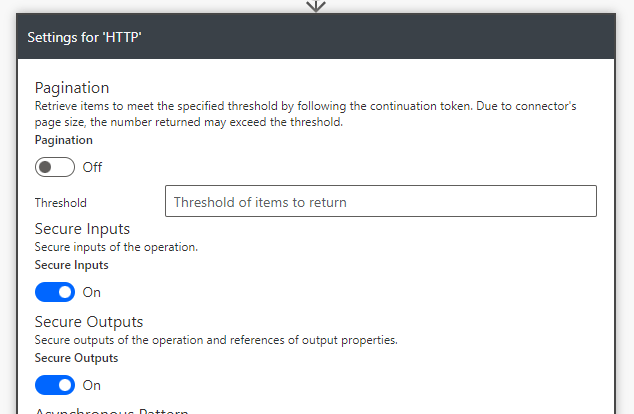
This setting will ensure that the output from this action is secure, and not visible in the logs. It is also important to toggle Secure Inputs and Secure Outputs to be in On -state for the HTTP action, since it is processing this secret value, and might also pass something forward as well. Let’s proceed to configure the HTTP action.
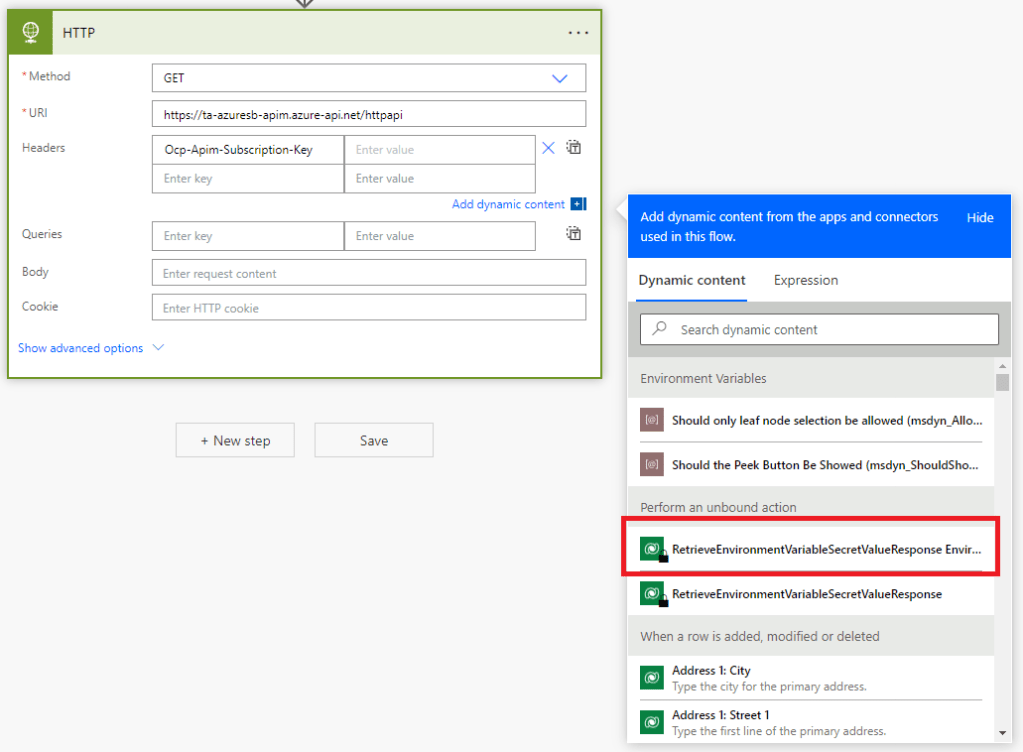
After selecting the unbound action input, the Header configuration should look like this:

Now we will enable the mentioned Secure Inputs and Secure Outputs.
Let’s add one more action to check if the test was successful. HTTP Get should return the status code “200” which basically means the request was successful.

Running a quick test shows that the flow is executing as expected.

That covers the whole concept of how to securely refer to a secret inside Azure Key Vault, and use it inside Cloud Flow! It’s also good to understand that this supports also the solution imports and CI/CD processes nicely, as you don’t need to change the Cloud Flow at all when importing to any target environment, as the environment variable is acting as a reference to the Azure Key Vault secret, and the reference is updated upon the import to point to the correct Azure Key Vault.
I hope you enjoyed reading, and you will utilize Azure Key Vault in larger scale in your future projects!
