

I was recently helping out a colleague who was struggling with changing the default behaviour of the email editor. Information floating around didn’t really cover all the corners, or was outdated in one way or another, so I felt it would be beneficial to share this with the community as well 🙂
How to change the default behaviour
Let’s first start by examining the default email form.
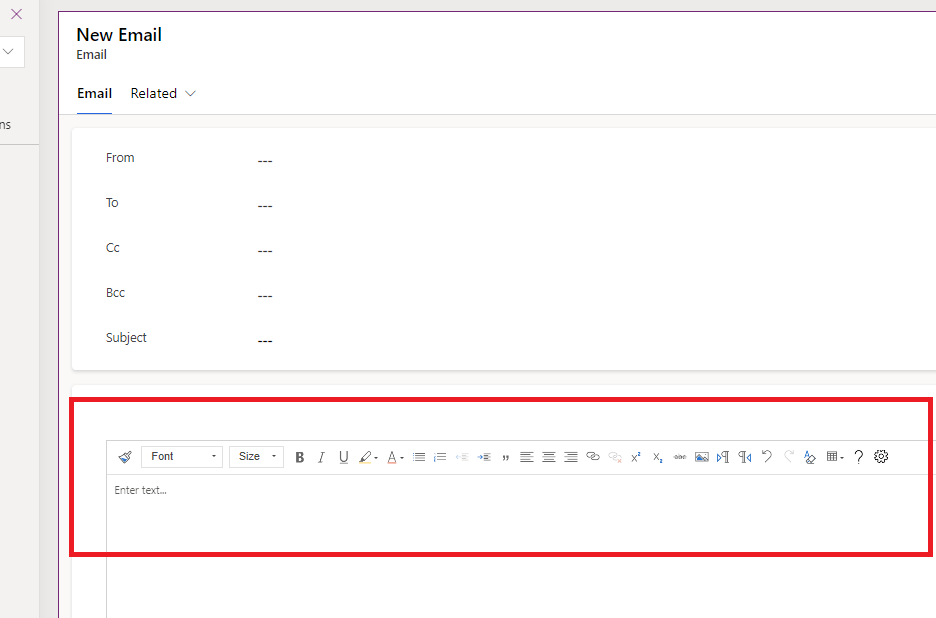
Clicking the Description -column in the form will display you the components added for this column. We can see that there is already the Rich Text Editor Control attached into the Description -column.

Our goal is to replace the default rich text editor experience with a custom JSON web resource, which will be based on the default configuration, but with the changes we want to apply to the default behaviour.
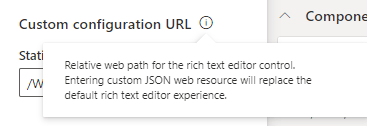
First you should try to find the Web Resource, which was set to the Custom Configuration URL of the Rich Text Editor Control in the Description -column in the Email form.
Fastest way to access the file is to simply copy the Static value, which by default should be /WebResources/Activities/SystemLibraries/msdyn_EmailRTEconfig.js , and paste it after your D365 environment URL
User friendly way is to just browse the Default Solution and do a search with the filename msdyn_EmailRTEconfig.js
Searching from the default solution should give you the desired result.

Click the Web Resource, and then you should see the URL of the file. Click the URL to open the file content in a new tab to see the JSON contents of the file.

When you examine the JSON contents of the file, you should see the contents looking like in the screenshot below.
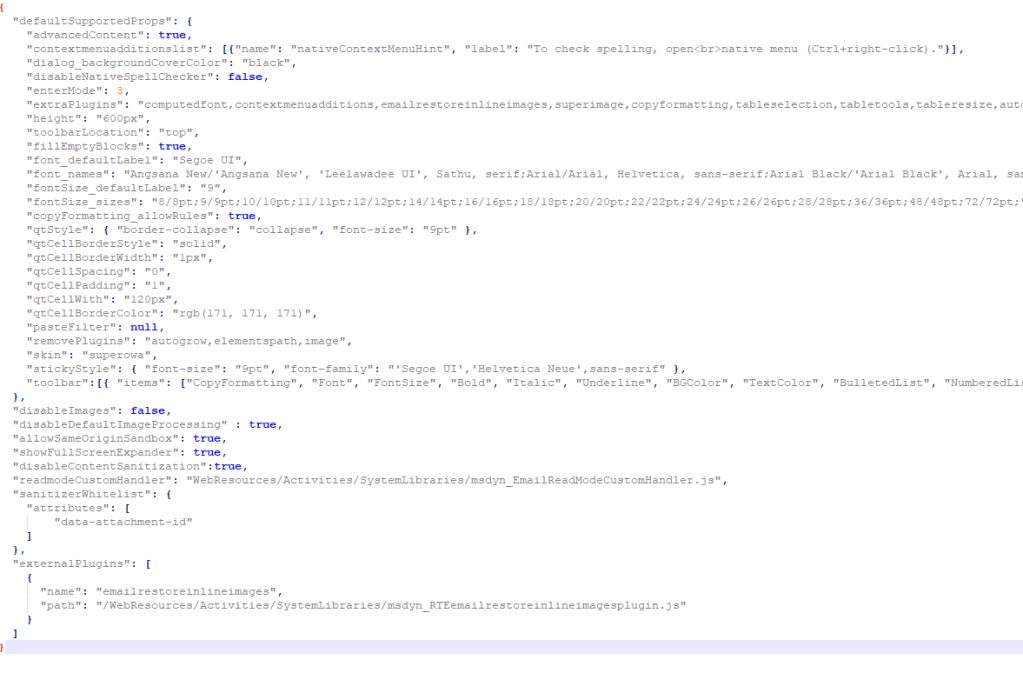
Here the properties we want to focus into is under the defaultSupportedProps -section. So what exactly is defaultSupportProps? In a nutshell, defaultSupportedProps is basically a set of properties for the plug-ins, and includes support for all the CKEditor configurations, which you can also extend with your own properties for more plug-ins you might be adding or creating later. All CKEditor-supported properties are placed under defaultSupportedProps.
Copy the JSON content of the file into your editor of choice (Notepad++ 😉 ), and save it with a meaningful and identifiable name. Now it’s time to actually apply the changes we want!
For changing the default font and font size it is really simple and minimal change. Please do note, that you need to change the attributes “font_defaultLabel” and “fontSize_defaultLabel” for changing the label, and apply the change also for the “stickyStyle” -attribute, which will set the actual default font and font size. Change all the forementioned values to get the desired outcome. I’m using Calibri with font size 11 as reference, to match it with my Outlook settings 🙂

After the changes have been applied, we are ready to take this new Custom Configuration into D365!
Add the JavaScript file as a new web resource into the environment
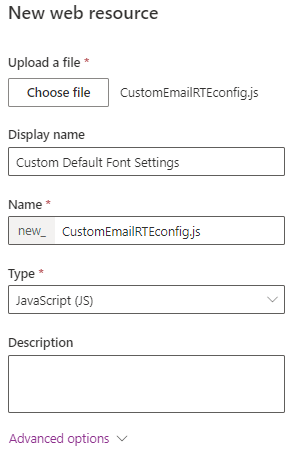
Find the URL of the Web Resource similarly as was done with the default Custom Configuration URL. In my example, the URL was https://not-a-real-orgname.crm4.dynamics.com/WebResources/new_CustomEmailRTEconfig.js
Now we just have to change the Static Value to match the relative path of the Web Resource. Note: It’s really important to use the relative path instead of the absolute path, since the absolute path is environment specific. This means that when you move the solution to another environment, it won’t work as intended.
Configuration of the form configuration should look like this:

Apply this same change for all the forms for the Email table that you want to have the same default behaviour, and click the Save and publish -button.
Time to check the results! Now some drumroll, please….

… and it works! And if you did the configuration properly, you are also able to move this in solutions successfully as well 🙂
That’s all, thanks for reading through!
